Archive | Sides, Snacks, and Misc. RSS feed for this section

Baked Mozzarella Sticks made from Egg Roll Wrappers

29 Dec

So I tried this recipe from Recipe Diaries, which she got from Taste of Home, and it didn’t quite turn out how I thought it would. When I think of mozzarella sticks, I think of ooey gooey cheese that strings on for days. My cheese didn’t exactly melt in the middle of these sticks. I used string cheese, as the recipe calls for, but I think it would work a lot better if I used sticks of real block cheese. The sticks tasted good, they just didn’t mimic the original deep fried version I was craving.

Jason really liked them so I think I’ll try it again using some of the incredible Mississippi State Cheese we got for Christmas.

If you make them, let me know how you liked them/modified them… I really want this healthier version to work!

Baked Mozzarella Sticks

4 pieces of string cheese cut in half
4 egg roll wrappers cut in half
olive oil
salt
marinara, spaghetti sauce, salsa, or ranch

Continue reading

Homemade Laundry Detergent

14 Dec

This is so easy to make. It seriously takes all of about 15-20 minutes and works like a charm! I started making my own when I got sick of paying $13 for 1.17 gallons and figured I could make it on my own for about $2.25 per gallon.

I used to use Gain or Arm and Hammer liquid laundry detergent and so far, I have been very happy with the cleaning power of my own concoction.

I store my detergent in an empty and clean milk jug. At first, I tried storing it in an old Gain container but you have to shake the container before using it and the lip at the top of the pourer in the Gain container spilled and made a big mess. The milk jug works great! I use an old laundry container screw on lid as my measuring cup but you could use any kind of cup/measuring cup.

Enjoy!

Homemade Laundry Detergent

Makes: 1 gallon

1/2 bar of Ivory soap, grated
1/4 cup washing soda (found in the laundry aisle in most stores – Arm & Hammer makes it)
1/4 cup borax powder (also in the laundry aisle – look for “20 Mule Team” brand)
3 c. water, plus more to fill a gallon

Put the grated soap in a sauce pan. Over medium heat, add 3 cups water and heat until soap melts. Add washing soda and borax and stir until it is dissolved. Remove from heat.

Pour mixture into a clean gallon sized jug. Add 2 cups hot water to the bucket. Shake to stir. Now add water to fill the jug. Shake to stir. Let the soap sit for about 24 hours and it will gel (it’s a little like magic!). You use ½ cup per load.

Tips
– This soap does not foam, so don’t be surprised when you first use it.
– This soap has no scent. Feel free to add a few drops of essential oil if you want.

Mac n’ Cheese Bites… A Tailgate Favorite

3 Oct

Macaroni and Cheese is the ultimate comfort food. Most of us remember mac n’ cheese from the blue box as one of our first culinary triumphs. I remember helping when I was little and having such a feeling of accomplishment when the yellow powder melted into a creamy cheese-ish topping.

Have you had the blue box as an adult? Not as a college kid alternating between that and Ramen Noodles, but as a  real working adult? You probably think I’m going to say that in retrospect, the blue box isn’t that great and our palates should be much more sophisticated by now, but I’m not. The blue box is still pretty awesome. Nothing beats a little nostalgia here and there…

But in all seriousness, homemade mac n’ cheese is super easy and takes only a few minutes longer than the boxed stuff. Not to mention it isn’t full of ingredients you can’t pronounce and you use real cheese as opposed to a weird smelling cheese-ish powder.

Don’t let homemade mac n’ cheese intimidate you. If you whisk your sauce constantly and don’t let it burn, you’re golden.

You can make this recipe as little bites, like I’ve done, or you can just throw it all into a casserole dish and make it a family style side dish. Little bites make for the perfect party food. They are even good room temperature. Yum!

Mac N’ Cheese Bites

Time: 20-25 min.
Level: Medium
Servings: 48 mini macs

1/2 lb. elbow macaroni
1 1/2 tbsp. unsalted butter, plus more for brushing
1/4 c. Parmesan cheese, grated
2 tbsp. all-purpose flour
3/4 c. milk
1 c. cheddar cheese, shredded
1 c. deli-sliced American cheese, chopped
1  egg yolk
1/4 tsp. paprika

Preheat the oven to 425°. In a large pot of boiling salted water, cook the macaroni about 5 minutes. Drain pasta. Spray mini muffin tins with non-stick spray. Sprinkle muffin cups with 2 tbsp. of the Parmesan.  In a large saucepan, melt butter. Whisk in  flour over medium heat for 2 minutes. Whisk in milk and cook, whisking constantly, until boiling, about 5 minutes. Add cheddar and American cheeses and whisk until melted. Take the saucepan off the heat and whisk in the egg yolk and paprika. Fold in the drained macaroni.

Spoon macaroni into muffin cups.

Sprinkle the remaining 2 tbsp. of Parmesan on top. Bake the mini macs in the oven for about 10 minutes, until golden. Let cool for 5 minutes. Yum!

Tips
– After sprinkling the cups with  Parmesan, add a small crumble of bacon for extra flavor. Ham would work well, too!
– You can make the mac n’ cheese the day before and leave it in the fridge until you are ready to bake.

Cheddar Bacon Ranch Pull Apart Bread

22 Sep

This recipe came directly from plainchicken.com and boy, was it good! We had a football party (go SEC!) the other day and I made this bread. It was a huge hit! Everyone loved it and it couldn’t have been easier to make.

I will definitely be making this bread again for the Mississippi State University football game this weekend. Nothing is better than tailgating in the Junction. If you’ve never done it, you’ve definitely got something to add to your bucket list. Enjoy!

Cheddar Bacon Ranch Pull Apart Bread

1 unsliced loaf of (round is preferable) sourdough bread
8-12 oz cheddar cheese, thinly sliced
3 oz bag real bacon bits
1/2 cup butter, melted
1 tbsp Ranch dressing mix

Using a sharp bread knife cut the bread going both directions. Do not cut through the bottom crust. Place slices of cheese in between cuts. Sprinkle bacon bits on bread, making sure to get in between cuts. Mix together butter and Ranch dressing mix. Pour over bread. Wrap in foil the entire loaf in foil and place on a baking sheet. Bake at 350 degrees for 15 minutes. Unwrap. Bake for an additional 10 minutes, or until cheese is melted. Yum!

Easy Baked Potato Side Dish

12 Sep

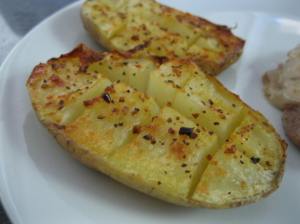
Twice baked potatoes are a perfect side dish. This preparation is simple and quick and doesn’t create any extra dirty dishes!! They are so simple, yet so delicious. Try them tonight!

Easy Baked Potato Side Dish

Servings: 4
Time: 20 minutes
Level: Easy

2 baking potatoes
1 tbsp. butter
1/2 tbsp. favorite seasoning (I used Weber’s Kick’n Chicken seasoning)

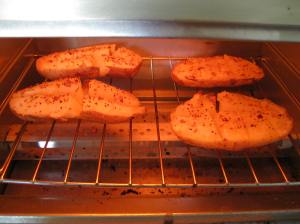
Wash potatoes thoroughly. Poke holes in potatoes with a fork to allow steam to escape. Cook potatoes in the microwave for about 6 minutes. Cut potatoes in half lengthwise. Score potatoes, making a checkerboard pattern, but not cutting all the way through. Top with butter and sprinkle with seasoning. Broil in the oven or toaster oven (So your kitchen doesn’t get so hot!) on high for 15 minutes.

Yum!

Tips
-If you wanted, you could top the potatoes with additional toppings such as sour cream and cheese.

Banana Oatmeal Granola Bar Bite Cookies… Butterless, Flourless, Eggless, and No Added Sugar. So What’s In There?

20 Aug

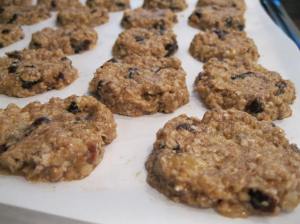
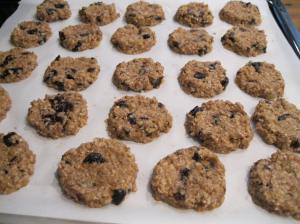
These granola bar bites have ever so eloquently been dubbed “old people cookies” because of their ingredients. But take them seriously because they are VERY yummy! I like to make these little bites to eat for breakfast, as a post work out snack, or as a mid-day pick-me-up. They pack well and can be made into various shapes such as round cookies, square cookies, or bars.

They are super healthy and kids LOVE them. You won’t believe these vegan goodies are made without butter, flour, eggs, or added sugar! The bananas and dried fruit add lots of texture and sweetness so enjoy!

Banana Oatmeal Granola Bar Bite Cookies

Serving: 24 cookies
Time: 35 minutes
Level: Easy (super kid friendly, so let them help!)

3 ripe bananas (wait until they are nice and spotty. They are sweeter that way.)
2 c. oats (you can use whole wheat, steel cut, quick cooking, or most any other type of oats)
1/2 – 1 c. dried fruit, chopped (I used prunes but apricots and cranberries work well, too)
1/3 c. coconut oil (you can use vegetable oil)
1/2 c. nuts, chopped (optional)
1 tsp. cinnamon
1 tsp. vanilla

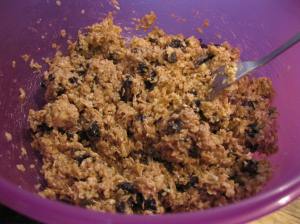
In a medium bowl, mash bananas with a fork until smooth. Stir in remaining ingredients. Preheat oven to 350°. Let mixture sit on the counter for 15 minutes.

On a parchment paper lined baking sheet, drop mixture by spoonfuls. With your hands, shape cookies into desired shape and press down until flattened to desired thickness. (Cookies will come out of the oven in the exact same shape they went in…) Bake for 20 minutes. Yum!

Tips
– Don’t forget to use parchment paper. The bananas and dried fruit will leave a sticky residue on your baking sheet if you don’t!

Grilled Corn with French Onion “Butter”

12 Jul

Grilled corn on the cob is probably my favorite summertime veggie. When the husks burn on the outside of the corn, the kernels practically get a steam bath and become infused with a wonderful smoky flavor. When I grill corn on the cob, I make sure to grill a lot of it! Leftovers can be reinvented into so many delicious dishes… the options are truly endless.

You can cut off the perfectly charred kernels to throw into a salad, use them to make a cold corn soup, (whew… recipe for another day, pure deliciousness!) make a salsa or dip, or even just reheat them with a little salt and butter for an easy side dish on a busy night.

Grilling corn is super easy. There are a lot of theories on how to grill the perfect ear of corn but this one seems to work best for me. Sorry there aren’t any pictures…

First, with kitchen scissors, I trim the silk fibers that are poking out of the top of the ear. Then, I peel off the first entire layer of the husk. After that, I throw the ears on to the grill, set at medium-high heat, for 25-30 minutes, turning every once in a while. Once they come off of the grill, totally black and super messy, I peel back the husk and take off the silk fibers. I guess that’s called shucking?! Ahhhhh-mazing!

Nothing can beat an ear of grilled corn slathered in melted butter and dusted with salt. But for the sake of not boring my family with the same ole’ side dish, just because I love it so much, I started doing some experimenting.

Normally I don’t have French onion dip in the fridge. Chip dip is just something I never buy. I’d rather use Greek yogurt and sour cream to make my own. I like controlling my own flavors and nutritional content when it comes to things like that. But, alas, the 4th of July left us with a tub and I figured I could use it. What was born was truly delicious and I hope you enjoy it.

Grilled Corn with French Onion “Butter”

Servings: 2
Time: 2 minutes
Level: Easy

2 ears of corn, grilled and shucked
2 tbsp. French onion dip (I used Dean’s brand)
1/4 tsp. cayenne pepper (or more…)
1/2 tsp. lime or lemon juice

Mix dip, cayenne, and juice together. Spread over all sides of the corn. Yum!

Tips
– I bet you could use any dip flavor… dill, ranch, etc.

Simple Sabroso Salsa

7 Jul

Sabroso means tasty in Spanish… I’m not sure if I used it in the right context or not, but hey, I only have a minor in the language so I’m not expected to know, right?

This salsa is called Sabroso Salsa because it is simply that, a tasty sauce… especially the next day, once all of the flavors sit and have a chance to mingle with each other.

If you have any leftover grilled corn, use it! If not, no worries! Canned corn will do just fine.

I served this salsa with tortilla chips but it would also be delicious served on crackers or bite sized baguette slices topped a little avocado and cheese. Appetizers, anyone?

Don’t forget to check the tips section for 2 great ideas for using up leftovers!

Simple Sabroso Salsa

Time: 5 minutes
Servings: A lot! It made about 3 -4 cups of salsa.
Level: Easy

1 can black beans, drained and rinsed
1 can whole kernel corn, drained and rinsed
1 can Rotel, drained
1 tbsp. jalapeños, diced
2 tsp. cumin
2 tsp. chili powder
1 tsp. garlic powder
1 tsp. salt
2 tsp. lime juice

Mix all ingredients together and let sit in the fridge until ready to serve. Yum!

Tips
– Play with the spices. You can add as little or as much of each as you’d like!
– I spooned leftover salsa over grilled chicken for dinner the next day. Yum!
– Another idea for leftovers!!!! I used the rest of the leftover salsa to make a simple pasta dish. I heated the salsa in the microwave and mixed it with cooked, drained pasta shell noodles and leftover shredded chicken. It was so yummy!!

Okie Dokie Artichokie Dip

12 Jun

I love artichokes. They are delicious on pizzas, amazing in pasta dishes, and great in salads. I love this artichoke dip recipe because it really brings out the bite that artichokes naturally have. Using a little citrus and tangy yogurt makes the artichoke come alive.

Having a can of artichoke hearts in the pantry can be a life saver when you need a last minute appetizer for impromptu company or for those lovely nights when your husband forgets to tell you, until you’re brushing your teeth for bed, that he signed up to bring something for the potluck at work the next day.  🙂

Artichoke Dip

Servings: 8
Time: 5 minutes
Level: Easy

1 can artichoke hearts
1/2 c. plain yogurt
1/2 c. mayo
1 tsp. garlic powder
1 tsp. crushed red pepper flakes
1 1/2 tsp. Worcestershire
1 tsp. lemon or lime juice
1 c. Parmesan cheese, shredded

Drain artichoke hearts and chop them into bite sized pieces.

Mix all ingredients together and chill in the fridge until ready to serve.

Yum!

Tips
– Making this ahead of time will help enhance the flavor. Honestly, it’s not that great immediately. Let it sit in the fridge for at least an hour if you can.
– I used non-fat yogurt and low-fat mayo.
– Try using Greek yogurt instead.
– Don’t have yogurt? Use  1/2 c. of extra mayo or 1/2 c. of sour cream.
– Serve dip with crackers or veggies.

In Honor of Cinco de Mayo…

3 May

This slideshow requires JavaScript.

Cinco de Mayo… Ahh, what a delicious holiday. Yeah, yeah, I know. It’s a holiday that celebrates  Mexico’s victory over the French on May 5, 1862.  But, dang, celebrating  their victory with a delicious dinner is just fine by me. Our neighbors to the south know what their doing when it comes to their amazing cuisine and I’m not ashamed of how much I love it!

If your going to be staying in this Cinco de Mayo or if you are planning on having a blow out fiesta with friends, check out these recipes below. I took a look back at my recipe collection and my love is clearly evident… I can’t say that ANY of these recipes are even slightly  authentic but they are definitely inspired by south of the border flavors.

Grab yourself a basket of chips and a bowl of salsa, maybe a margarita or two, and celebrate!

Enchilada Pie 

Sweet Potato and Black Bean Enchiladas (vegetarian and vegan)

Steak Fajitas

Mexican Cornbread

Quinoa Salsa Side Dish

Gringa Tostada

Fiesta Fritata

Baja Shrimp Tacos with a Corn and Radish Salad